| |
Advanced Tutorial Chapters |
|
1 |
|
|
|
|
|
|
|
|
|
|
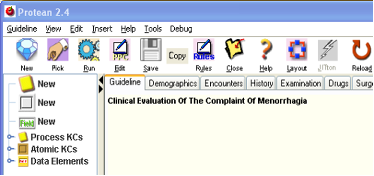
Chapter 1 - Authoring and Editing in Protean
It is best to learn about authoring and editing of guidelines and KCs in Protean by creating a new guideline. The Royal College of Obstetricians and Gynaecologists of UK has a simple guideline for management of menorrhagia that can be used for our exercise. We will only be using the first portion of the guideline which is “Clinical Evaluation of Complaint of Menorrhagia”. A great advantage of using this guideline is that it is also represented in a graphical algorithm, which makes our task of analyzing the guideline to convert it into the Proteus format simpler.
Analysis of a Guideline
The figure below shows the RCOG algorithm for the guideline part we are interested in.
Figure 1.
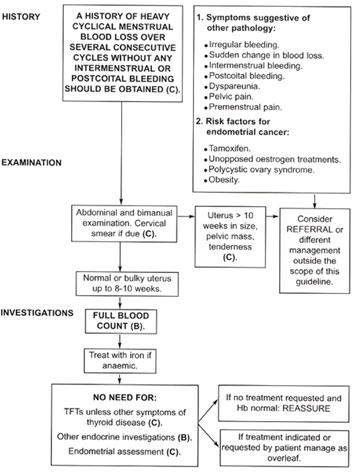
For our exercise, we will try to adhere to the algorithm as faithfully as possible. In some places, we will also deal with the omissions or errors in it by making reasonable guesses about the intent of the author instead bringing our knowledge of gynecology or medicine to bear on the problem. There will be opportunities of deploying your expertise in other Proteus guidelines that you may create in future. At every step, we will analyze a portion of the algorithm and proceed to implement that in the Proteus format. By the end of the process, we will have a Proteus guideline ready for clinically evaluating the menorrhagia complaint.
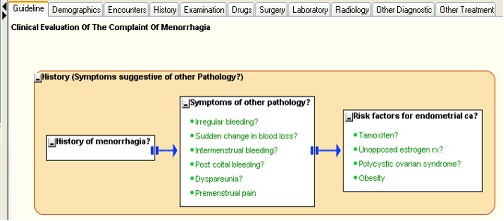
The first step in figuring out how we will convert this algorithm into a Proteus guideline is to identify what are the activities in it and what are the inferences or decisions made based on the information that is derived from those activities. In the algorithm, the history activity, with several actions within it, is performed before an inference is drawn. Since History itself has several other actions in it let us designate it to be rendered into a process KC. We mark it with a rounded rectangle, which is the icon for process KC in Proteus Graphical Language (PGL). The History process has three different parts that can be designated as actions or Atomic KCs. These have been shown shaded in the figure. At the same time it is good to think about what is the purpose of the activity being undertaken – what information is being sought about the patient when that activity is underway?
Figure 2.
Start creating a new guideline in Protean
Let us begin the process of creating a new Proteus guideline by transcribing this portion of the algorithm in Protean.
-
Start the application if it is not already running. If a guideline is open in Proteus, click on the [Close] toolbar button to close it.
- Click on the [New] button to create a new guideline. You will notice that the main panel background has turned to pale yellow indicating that protocol now has a guideline in it. At the same time, a dialog box opens up. This is the PPC Editor. Anytime a new PPC is introduced in the guideline this dialog conveniently opens up, to allow us to enter basic details about the PPC. Enter the name we want to give to the guideline, which is the same that the algorithm has been named in the RCOG site, “Clinical Evaluation Of The Complaint Of Menorrhagia”, in the name field. Go to the [Knowledge] tab and check off the [Publish] checkbox. Declaring the guideline “published” will allow us to retrieve the guideline; unpublished guidelines are not visible in the Guideline Selection box. For the time being, let us not enter any other details for the guideline and close the PPC Editor, by clicking on the [Ok] button of the editor. You will see the name of the guideline appear on the main panel.
Figure 3.

Figure 4.
Creating a new PKC
Now that we have a guideline created, we can start populating it with the activities that will take place within it. The very first activity in Menorrhagia algorithm is a process called History, as our analysis revealed. Since Process KCs (PKCs) represent processes in Proteus, let us create a new PKC.
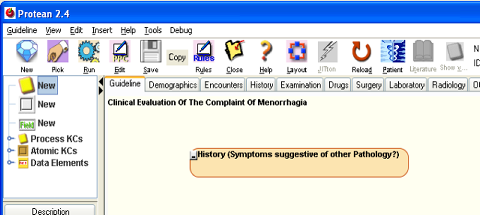
- In the upper left corner of the Protean window is the panel that shows the PPC library. The top three elements in the PPC library tree are to allow us to drag new PPCs into the guideline. The topmost of the three elements is for PKCs. Drag it with your mouse and drop it on to the guideline in the main panel. You will see a beige colored round cornered rectangle appear in the guideline. A PPC editor also springs up to allow us to enter the details of the new PKC. Give the PKC a more descriptive name than just History. Let us call it “History (Symptoms suggestive of other Pathology?)”. We add the question to the PKC’s name because we want to be aware that when the history process executes, we are mainly trying to find if the patient has some other more sinister pathology than mere menorrhagia (DUB as we call it now). Submit your changes to the new PKC by closing the PPC editor by clicking the [Ok] button. You will notice that the name appears on the PKC in the main panel. You will also notice that the PKC expands to accommodate the rather long name that it has been given. This is a feature of all the KC icons in Protean; they expand and shrink based upon the contents and components that they have within them. You can change the size of a KC only by manipulating its contents; you cannot change the size or shape of a KC directly.
Figure 5.
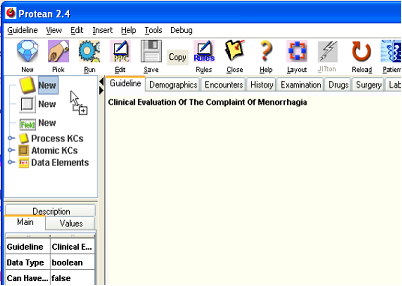
Figure 6.
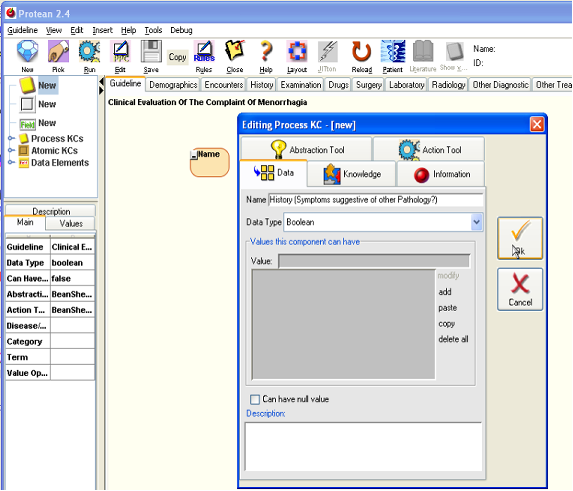
Figure 7.
Creating New AKCs
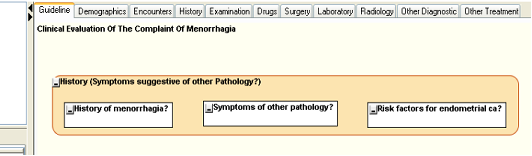
As per our analysis of the Menorrhagia algorithm, the History process contains three other activities, all of atomic nature. Therefore, we need to create three new AKCs in the History PKC.
- From the PPC library tree, drag the second icon (shown as a solid square) to anywhere within the History PKC in the main panel. This will create a new AKC represented by a white rectangle within the PKC. The PKC will change shape and size to accommodate the AKC. In the PPC editor that opens enter the name for the new activity – “History of menorrhagia?” again, representing the fact that ultimate purpose of the activity itself is to answer this question.
- Drop two more AKCs within the History PKC and name them “Symptoms of other pathology?” and “Risk factors for endometrial ca?”, because if you look at the equivalent activities in the RCOG Menorhhagia algorithm these are the questions that are sought to be answered by those activities.
Figure. 8
Adding Data Elements to the AKCs
We have represented actions within the “History (Symptoms suggestive of other Pathology?)” PKC, but we have not specified what data will be generated by those actions. The data can be specified by including data elements within the AKCs.
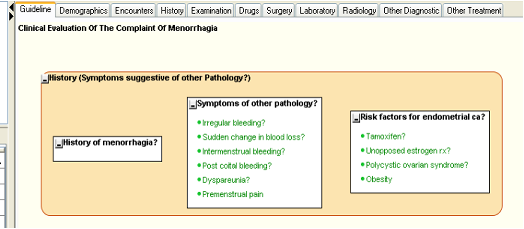
- From the PPC Library, select the New Data Element icon and drag it into the second AKC, “Symptoms of other pathology?”. A new data element appears in the AKC as a bulleted line of green text, with the word “Name”, indicating that the name of the data element has not been specified. A PPC Editor also opens up to allow us to enter to specify the name and other characteristics of the data element. Give the data element the name – “Irregular bleeding?”. Accept all other default values for the data element as they are and close the dialog by clicking on [Ok].
- Add several other data elements to the second and third AKC in the same way as follows:
To “Symptoms of other pathology?” AKC add data elements:
- “Irregular bleeding?”
- “Sudden change in blood loss?”
- “Intermenstrual bleeding?”
- “Post coital bleeding?”
- “Dyspareunia?”
- “Premenstrual pain”
To “Risk factors for endometrial ca?”, AKC add data elements:
- “Tamoxifen?”
- “Unopposed estrogen rx?”
- “Polycystic ovarian syndrome?”
- “Obesity”
The guideline at this stage should look something like the figure below.
Figure 9.
- Notice that we did not add any data elements to the first AKC, “History of menorrhagia?”. This is because that AKC is expected to collect just one bit of information, which is if the patient does have a genuine menorrhagia. We could have added one data element for the purpose, but the empty AKC also can fulfill the same responsibility – later we will see how.
Linking KCs
We have already represented the activities that are to take place within the History PKC, but we haven’t really provided them with any sequence or workflow control. We can proceed to do that now.
- Drag the three AKCs in the History PKC to align them horizontally, with “History of Menorrhagia” first, followed by “Treatment required?”, and then “Risk factors for endometrial ca?” in that order. Place them in such way as to leave about half an inch of space between them.
- You must have noticed that when your mouse hovers near the edge of a KC little red spots appear around the edge of the KC. These are the ports of the KC – the points where the KCs can be connected by Proteus activity links – the PALs. Highlight the ports on “History of Menorrhagia AKC” and start dragging from one of the ports towards the AKC next to it. As you start dragging, you will notice a line gets created from the port and its other end starts moving with your cursor. This is the nascent PAL you are creating. You will also notice that ports on all the other KCs within the “History (Symptoms suggestive of other Pathology?)” are highlighted. This is to show all the valid ports to which the new PAL may be connected. Continue dragging the PAL onto one of the ports on the adjacent AKC, “Symptoms of other pathology?”, and drop it. This links to the two AKCs with the PAL.
- When you created a link, at the same time a PAL editor dialog box opens up to allow specifying some details of the PAL. Leave the type of the PAL to the default value to specify the PAL to be of the sequential type. Click ok to close the PAL editor. You will notice that the new PAL has now connected two of the closest ports on the adjacent AKCs, and is of the sequential type (with two parallel bars at the start end).
- Create another sequential PAL in the same way, between the “Symptoms of other pathology?” AKC and the “Risk factors for endometrial ca?” AKC.
We now have a PKC with three AKCs, with the first set to be launched with the launch of the PKC and the other two are to be launched after it sequentially, i.e. each is launched after the execution of the previous has completed.
Figure 10.
Testing KCs during Authoring
Now that we have somewhat more fleshed out things added to the guideline, we can start testing our guideline and its components. As we go on building the guideline and KCs, we can keep testing KCs by launching individually launching them.
- Click on any KC and check the Info Panel. You will notice that the abstraction inference tool for the KC is “UserAbstractionInference”, which means that that you the user are the inferencing mechanism to derive the abstraction for the KC. Every abstraction inference tool, automated or human, considers the value of the contents of a KC and then creates an abstraction for the KC. The KC may then accept the abstraction as its value. Protean by default declares the user to be the “inference tool” for all the situations. You can easily change this in the PPC editor. But for now, since we have confirmed that the KC has a way to create inferences let us launch it to test it.
- Before you proceed, click on the [Save] on toolbar to preserve the work that you have done. Please ensure that nothing is selected in the main panel when you click [Save]. If you click [Save] with a PPC selected, only that PPC will be saved.
- Right click on the Process KC “History (Symptoms suggestive of other Pathology?)” and from the context menu that appears select [Run]. This launches the selected PKC. (You can always launch any AKC or PKC in this manner without having to launch the entire guideline).
Figure 11 .

- Since the first AKC (“History of menorrhagia?”) has no data elements, the AKC does not open a dialog for data to be entered. Instead, the abstraction inferencing process is started directly and since the user is the abstraction inference tool, you as the user are asked to create an abstraction for the AKC. The KC shows a dialog to allow the user to record the abstraction inference. The combo box at top of the dialog contains all the possible values that the KC can possess. If the KC has any contained entities, then the values of those are shown in the bottom panel. In this case, since the AKC has no contained data elements the panel just informs that there are no PPCs in the KC. To allow you to see which abstraction value you are creating, the spot where the values of the KC would be displayed turns red.
- Select one of the values from the combo and then click [Ok] to submit the abstraction and close the abstraction inferencing dialog. You will see the value you selected is now reflected in the KC in the main panel.
- Since the value of the AKC “History of menorrhagia?” changes, it triggers the abstraction inference tool of its container, the PKC “History (Symptoms suggestive of other Pathology?)”. This PKC also has user specified to be the abstraction inference tool, therefore the abstraction inference dialog is shown again to enter its value. This completes the abstraction cascade. After the abstraction cascade is done, the link between the first AKC and the second AKC is activated. This leads to triggering of the latter (Atomic KC “Symptoms of other pathology?”).
- Enter some values in the AKC dialog that is displayed (any values will do) and then submit it. This leads to the user abstraction inference tool dialog for the AKC being displayed for you to enter the abstraction value. Once you submit the abstraction value, the container PKC’s user abstraction inference dialog is launched yet again. Repeat the process and continue. You will notice that by the time the execution of the PKC is complete you will have entered and submitted data twice and changed abstraction values six times. This is tiresome! We can automate the abstraction inference making process by specifying a tool that can work with rules. In the next phase of our guideline creation, we will do just that.
Specifying an Automated Abstraction Inferencing Mechanism
To allow the KCs to utilize automated inferencing mechanism we need to edit them. So, right click the second AKC (“Symptoms of other pathology?”) and select edit on the context menu to open up the PPC Editor for the AKC. Select the “Abstraction Tool” in the PPC Editor. From the combo box “Abstraction Inference Tool” select “Bean Shell for Proteus”. Click [Ok] to commit the change you made. If you look at the Info Panel now, you can see that the Abstraction Inference tool of the KC has been changed to “BeanShellProteus”. Bean Shell Proteus is the rule engine component that will do the abstraction inferencing for the AKC now. But, not just yet. We haven’t told the Bean Shell Proteus how to make the inferences. We will have to give specify some rules to do that.
|