| |
Advanced Tutorial Chapters |
|
|
|
3 |
|
|
|
|
|
|
|
|
Chapter 3 - Creating Abstraction Rules
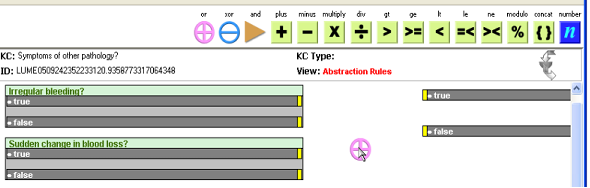
- The area where you see rectangular figures is the main panel of GreEd. This is where you will create even complex rules by simple clicks, and dragging and dropping. On the left side are aligned vertically all the contained PPCs of the KC for which you had launched GreEd. The PPCs show the values that they may possess within the rectangle they represent.
- On the right side, vertically lined up, are the values that the KC can have. Notice the small yellow rectangular spots near the ends of the
- Click on the button [
 ] on the toolbar. You will notice that your mouse cursor now carries with it an icon as you move it around. Move the mouse to the main panel below the toolbar and click somewhere in between the PPCs and the values. You will have created an “or” operator in your rule as represents “or”. ] on the toolbar. You will notice that your mouse cursor now carries with it an icon as you move it around. Move the mouse to the main panel below the toolbar and click somewhere in between the PPCs and the values. You will have created an “or” operator in your rule as represents “or”.
Figure 1.
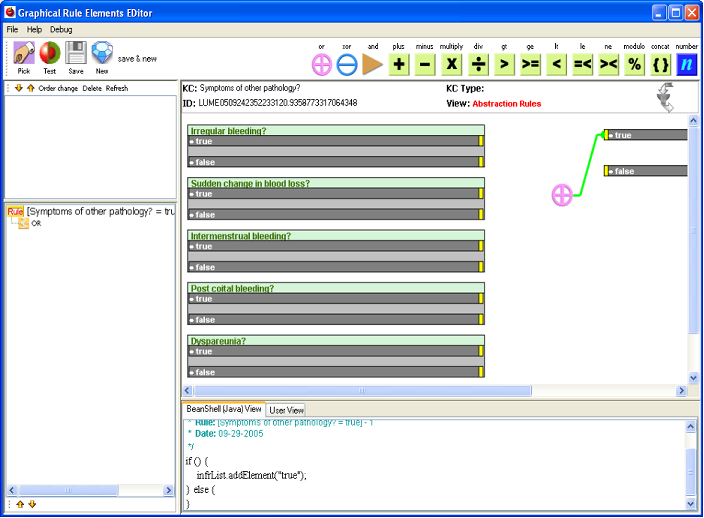
- Drag your mouse from near the right edge of the “or” icon in the main panel, you will notice a link being created. Drag the link and drop it on the port of the value, “true”. You will notice that the link turns to green color, and some text appears in the panel below and a tree with one branch appears in the lower left area of GreEd. You just created a nascent rule –incomplete as of now.
Figure 2.

Figure 3.
- Drag from the port of “true” value of the green colored PPC named “Irregular bleeding” to the “or” icon. You will notice the rule gets further enhanced in both its views – the text and the tree. Successively create links from the “true” of each of the PPC to the “or”. This will complete the creation of your first rule in GreEd. Click on the [Save] button. You will the rule appear in the upper left panel where the saved rules are visible.
Figure 4.
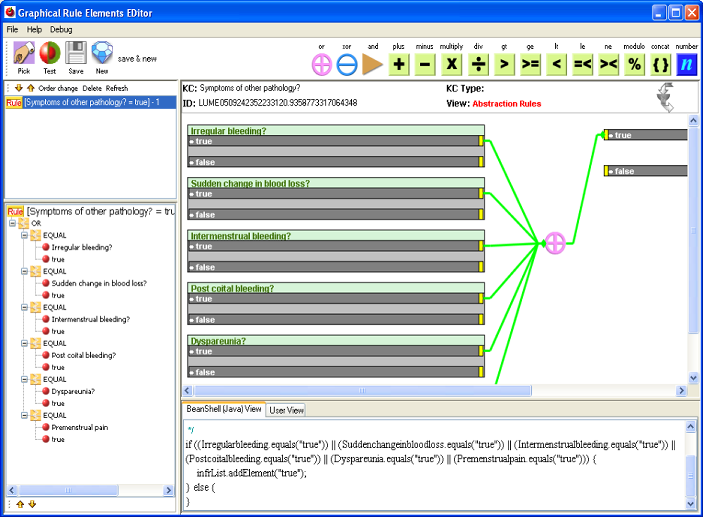
What does the rule you just created mean? To understand that you may look at the rule in the main panel or in the rule panel (the lower left side panel). The root (the first line) of the tree in the rule panel tells you what is the inference to be made, below it are the conditions which will have to be met (or in other words, be true) for the inference to be made. In this case, the rule you created is saying if any of the data elements in the AKC is true, the “Symptoms of other pathology?” will be true.
Note that each rule in GreEd environment can have only one inference. Also note all the other icons to the right side of the [or] button on the toolbar. The [or] button helped us create an or-expression, the other buttons can be used to create other kinds of expression. The number icon is different from the rest. When you have to enter a value with which some PPC’s value has to be compared, it can be dropped in the main panel and a value typed into it.
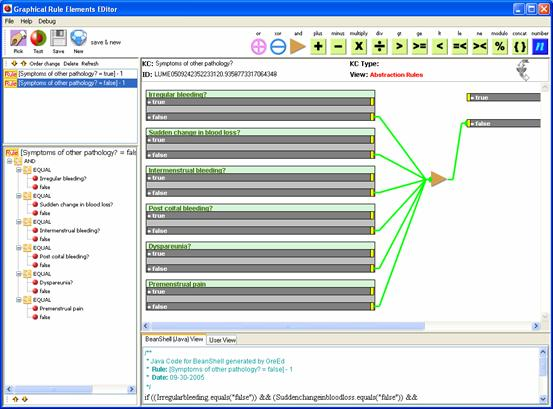
- Create another rule as shown in the figure. This time use the “and” icon instead of “or” and connect the icon to the “false” value of the AKC, and link all the “false” values of the contained data elements to the “and” icon. The rule created means that if all the values of the contained data elements are false, the “Symptoms of other pathology?” is “false” i.e., for the patient to be declared not to have symptoms of other pathology, she must have all the mentioned symptoms negative. Do not forget to save the rule after you have completed authoring it. You may close the GreEd window now and return to Protean.
- Though we are not creating a rule that requires this information, remember that to create a rule that with condition X is NOT EQUAL to Y (instead of X EQUAL to Y), press shift key when dragging to create a link from the PPC to the operator or the inferences. This creates a red colored link indicating that it is a negation of the condition specified.
Figure 5.
|